Soundslides Part 3: Instructions
The Soundslides assignment has four parts. You have completed Parts 1 and 2. You will use the 200 photos from Part 2 in this assignment:
- Part 3: Edit the best 25 photos from the 200 and submit for grading.
- Part 4: Produce a finished Soundslides, including edited audio and a PROPER CAPTION FOR EVERY PHOTO.
Follow these instructions for Part 3 of this assignment:
- From your 200 photos, select exactly 25 that together tell the story fully.
- The photos should demonstrate variety: different subjects, different distances, different angles. There should be some good detail shots (explained in Soundslides Part 2). The photos should also demonstrate the principles of good composition. All photos should be sharp and clear, and not dark. The subject of the photo must be obvious; that is, no one should wonder what this is a picture of!
- Using Photoshop, crop and tone all photos.
- Using Photoshop, resize each photo to an exact width of 1000 pixels, regardless of whether the photo is horizontal or vertical.
- Using Photoshop, save each photo (as JPG) with a resolution of 72 and a JPG quality of High.
These techniques are covered in detail in Module 8.
Telling a story
In selecting the photos for the final set of 25, consider the audio you have gathered and also the story arc (explained in Module 5).
You have watched and listened to several examples of Soundslides in this course:
- Jazz Tales
- Cockfighting in Puerto Rico
- Indoor Archery League
- Guitar Lessons at the Central Area Senior Center
- Special Needs, Special Driver
- Misty Morning Hounds
One you haven't seen yet, and certainly one of the best ever:
Here's one more excellent example that's presented as part of a larger story package. Notice how the photojournalist worked hard to bring a lot of variety into the photos:
- We Shall Not Be Moved: Marshall Cooper
- Read about the photojournalist
Watching these examples should demonstrate to you how photos are used -- in combination with sound -- in an audio slideshow to tell a story.
Caption information
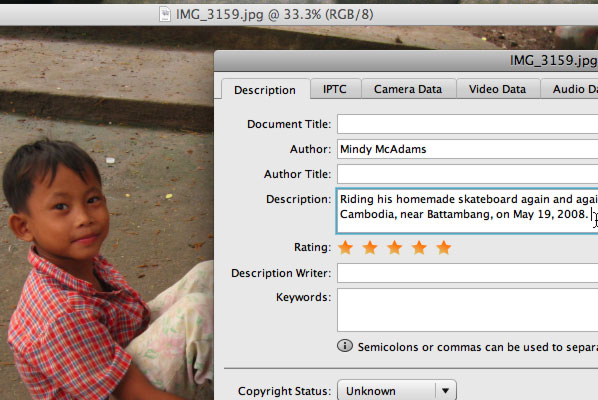
You may write your photo captions within Photoshop as part of the photo editing process. This is the practice followed by most professional photojournalists. However, captions will not be graded in THIS part of the assignment.
To write a caption in Photoshop, open the File menu > File Info. Write your caption in the Description field as shown below.

In the finished Soundslides, every photo will need to have a complete and accurate caption. These captions WILL BE graded in Part 4.
If you do not write the captions in Photoshop now, you will need to write them in Soundslides later.
(Caption information and writing captions was covered in Module 7.)
Naming your folder
The photos MAY still have the camera filenames (usually some letters and then several numbers). Example: IMG_0458.JPG (your camera may have a different style; that's okay). BE CAREFUL NOT TO OVERWRITE YOUR ORIGINAL FILE. It is best to keep your original photos safe and untouched; you may want to use them later for other purposes.
If you would like to rename the photo files, that's okay. However, Web files must have NO spaces and NO punctuation other than an underscore (_) in the filename. For example, waterfall_mexico.jpg is good, and waterfall mexico.jpg is unacceptable.
ALL PHOTO FILES MUST BE IN THE JPG FORMAT.
The folder name (on Dropbox) for this assignment must match this style:
Your last name, your first initial, an underscore, and soundslides3.
For example, if your name is Maria Jones, your folder name would be:
jonesm_soundslides3
You may need to delete older files from Dropbox at this time. DO NOT delete any files until AFTER your grade for that assignment has been posted.
PLEASE NOTE that it is VERY IMPORTANT in this course that you name files and folders EXACTLY as instructed for every assignment. Failure to do so will result in zero points for assignments, because a misnamed file is a file that will be LOST.
Questions?
If you have questions about any part of this assignment, post them in the Course Questions discussion in Sakai.
